
Page 5 - Feb_2020_SRG_33pg
P. 5
Slippery rock Gazette February 2020|5
www.usenaturalstone.org usenaturalstone use_naturalstone
Powered by
Training & Education
How Setting Materials Bond and Why Resin-Backed Tiles Fail
Educational informa- tion that adequately explains how a bond forms between tile and thinset or other setting mate- rials can be hard to come by, despite the abundance of general information avail- able online. Manufacturers do provide some informa- tion, but it is mostly market- ing jibber-jabber that cites bonding agents and secret formulas, without provid- ing details into exactly how the bonding process happens. This article exam- ines the basic chemistry of thinset and other setting materials and explains why some setting materials do not bond properly or at all. Armed with this informa- tion, installers may be able to avoid bonding failures.
Frederick M. Hueston, PhD
Stone Forensics
What Is Portland Cement?
It’s commonly misunder- stood that concrete is the same material as cement. They are actually two dif- ferent materials.
A typical bag of concrete, or Portland cement, is a combination of aggregate and a cement mixture. The cement mixture is made from either a combination of limestone, shells, and chalk or a combination of marble, shale, clay, slate, blast furnace slag, silica sand, and iron ore. The Limestone and other ingre- dients are heated at high temperatures to form a solid material, which is ground to
water, the hydration pro- cess cannot happen, and the concrete will not cure.
How Setting Materials Form a Bond
Tile setting materials are basically concrete. In order for these materials to form a bond with the back of the tile, there has to be some moisture ex- change. In other words, the back of the tile must be absorbent. As the con- crete cures, the little crys- tals and branches enter the pores of the tile, creating a bond.
Causes For Lack of Bond
Setting materials, in and of themselves, will not bond to non-absorbent
Setting Material Ingredients
Thinset and other set- ting materials are made of Portland cement. Although setting materials contain other ingredients including bonding agents, the main ingredient is Portland ce- ment. So, all one needs is a basic understanding of how Portland cement cures to understand how these set- ting materials bond to tile.
form a fine powder that we call cement.
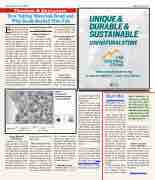
How Concrete Cures
Adding water to a mix- ture of cement and aggre- gates will cause a reaction called hydration. The ce- ment paste reacts with the water, forming microscopic crystals and branches (see Figure 1 – Crystals and Branches Formed During Hydration). Plainly stated, the concrete cures. Without
tile, because non-ab- sorbent tile lacks pores. Remember, bonding takes place when the crystals and branches enter the pores of the tile. Resin-backed tiles (whether absorbent or not) will not bond properly, because the resin forms a non-absorbent coating on the back of the tile.
Bonding Agents
Bonding agents, such as acrylics, latex, etcetera,
Figure 1
Crystals and Branches formed during hydration
are added to many setting materials to help create a strong bond.
However, in most cases the back of the tile will still need to have some ab- sorbency. Manufacturers often recommend using an epoxy setting material on resin-backed tile. Epoxy setting material creates a chemical bond that does not require tile absorbency
Most thinsets and setting materials have limitations listed on the bag or infor- mation data sheet. Review these limitations carefully and take the necessary pre- cautions to avoid bonding failures.
Dr. Frederick M Hueston has been teaching about tile and stone installation failures for decades. Tune into his new Stone and Tile Radio Show at www. blogtalkradio.com/drfred. The program airs every Wednesday at 6 p.m. EST.
Hard Hat
Continued from page 4
Depending on the envi- ronment, application and use, the shell might need replaced more frequently.
Some visible signs of hard hat damage, such as cracks, dents, or holes, are easy to see and are obvi- ous reasons to remove the hard hat from service. But even scores or scuffs on the surface might signal that it’s time to retire it. If a hard hat has been impacted or penetrated, remove it from service immediately. Dents from impacts stress the hard hat material, causing weak spots that are not accept- able. Scuffs or scores also weaken it by thinning out the shell. Consider replacement as soon as possible.
If the suspension straps are frayed or ripped, or have damaged stitch- ing, remove the webbing
immediately and replace it with a new suspension as- sembly. Check the plastic attachment clips to make sure they aren’t weakened or broken as well.
Proper Care and
Use of Hard Hats
Nothing lasts forever. But your hard hat is possi- bly one of the most robust pieces of personal protec- tive equipment you have. Proper care can help you get the full recommended life from your hardhat and suspension.
Please turn to page 7
Harsh chemicals or other severe conditions can also break down the shell material, pro- ducing brittleness. This often shows up as fading or discoloration as well. Chemicals can damage the suspension, too.
