I am sure that if you've been doing slab fabricating for any time span more than a week, you'll have, no doubt, run into the issue of edge darkening to match the color of the face of a slab of Natural Stone that's been RESINED.
You literally can't go out into a slab distributor's yard or a fabricator that has any number of slabs in his yard, and not find a slab that's been treated with the resining process. Knowing how to work with the challenges that color matching lighter edges to the face of a slab that may be ten shades darker can help a fabricator avert a potential "color" disaster.
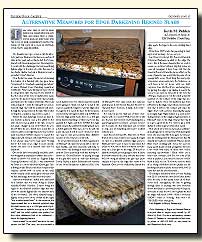
Over the last ten years, the process of resining the surface of a finished slab has gone from "occasional" to "standard operating procedure" at many Natural Stone Finishing operations worldwide. What many fabricators have found in using these slabs that have been resined is that the color of the stone is darkened in many cases by the layer of epoxy resin that actually penetrates into the surface of the slab. This is all well and good -until the slab gets cut and an exposed edge that will be polished will show the lighter, natural color of the slab. This is like cutting into a radish as opposed to a carrot.
Where the real challenge occurs (at least in my humble opinion): was a tint added to the resin when it was applied to the slab, or was it just plain straight epoxy resin? How do you know? How do you decide how much tint or color to add to your edge treatment in your best (and sometimes ONLY) chance to match the edge color with the face of the slab? The answer is not always easy, but in may cases "toning down" the color of an edge to more closely match the face of a resined slab can be achieved.
One of the first commercially available products designed specifically to address this issue -which is known by many as "Lighter Edge Staining Syndrome" or LESS -was introduced by Tenax as a stone enhancer called Ager. This is fitting, in that Tenax is the same company that supplies around 90% or more of the total world's supply of the epoxy glues that are used by slab finishing plants that resin their slabs.
I first encountered the "radish look" first hand on a kitchen that we were doing in Desert Amarillo/Golden Beaches. I tried using the Ager on the finished polished edge that was about ten shades lighter than the adjacent face of the countertop. The stone, already being a lighter, more porous stone, sucked up the Ager "like a sailor drinks beer!" In that instance, the Ager worked fine on a finished polished edge that had been run up to a 3,000 grit level of polish. There was no need for us to go up to a "final buff," and the polish quality was perfect, but that color difference had to be addressed -hence the Ager application.
I encountered "not as ideal" results in the next project we did. This time, we encountered a much darker stone, but still we had the "radish look" going on there; we had to tweak to the way we applied the Ager to stain the edge color enough for it to match the face. In this instance, we found that the Ager worked only AFTER we took the edge polish back down to a 400 grit level, dried everything out till it was bone dry, applied the Ager, and then AFTER the Ager dried completely polished everything back up to a 3,000 grit level. This has a lot to do with the pores that are found in most stones, but these can vary in size and porosity from different species of stone that you work with.
In yet another instance, the direct application of Minwax® oil stains for wood, left on the surface briefly, and then removed, will help to "tone down" the shading of many slabs that are resined. I have personally used this technique -known as "Donni-Fication" in paying homage to the guy who came up with this technique: Donny Taylor, a fellow Fabricator and member of the Stone Fabricator's Alliance (SFA). One of Minwax®'s best stain colors for optimum performance in the "Donni-Fication Process" is "Ipswich Pine." And yes, it really does work -in most cases.
But what if you've tried all of these techniques with no success? Well, I'm here to tell you that you don't need to start breathing into a paper bag taped to your face...at least, not just yet. A couple of other techniques are out there to help you if everything else hasn't worked well for you.
Last Resort Attempt #1: Heat Gun or Weed Burner. If you have tried to just apply the Ager or stain to a finished polished edge, and you REALLY don't want to have to take down the polish to 400, due to time constraints or whatever, try a heat gun to the edge. IF the job is already installed, you're going to have to leave the weed burner at the shop and ride this rodeo bull out using an electric heat gun type paint stripper to heat up the edge that needs to be darkened. Once you've sufficiently heated the edge, apply the Ager to the now, sizzling front edge.
If that does NOT work, that paper bag is starting to look inviting...but no, not yet.
Last Resort Attempt #2: Benzoyl Peroxide (Polyester Hardener) applied to the edge. Yes guys -this is the same chemical that we used to smear on our faces before a big date when we were all teenagers. I have been told that the chemical Benzoyl Peroxide has an effect on the pores of granite, very much like the pores of our teenage kid's noses. Good thing that most polyester resins never make into the bathroom, or we'd have a lot of issues with our kids! Anyways, I am told that if you are having trouble getting the edge to go darker to match the face, you can open up the pores in the stone by rubbing a small amount of the white polyester hardener on the surface of the edge that you want to darken. Once the hardener has been rubbed in to the edge, wipe off any excess hardener that is left on the surface and wipe the edges down with acetone. Immediately apply your Ager, Ager Tiger (which is a more penetrating version of the original Ager product) or Minwax® Stain to the edge. Repeat this step if you get a good result, but need to go a little darker in order to get a better color match.
This whole issue for me has had an additional challenge, due to the fact that God, having the sense of humor that He does, gave me the passion for working with the Natural Stone that He created, yet made me colorblind. What an irony! Here I love working with stone, but cant see many pastel shades of reds and greens. Yet even I can work with many of these new "colormatching opportunities." Heck, when it's a worst case scenario, and I'm not sure if the color is perfect, I ask someone that isn't colorblind to help me out. You know, come to think of it, being colorblind should qualify me for handicapped license plates for my truck, but I'll leave that rant for another article...
The thing to remember when you are dealing with LESS or when the stone looks like a radish from the side, is that pretty much all of these issues ARE manageable; the key to getting through them is making sure your customer knows that there is a potential for this to happen, and make it clear that we "can't guarantee that the edges will match 100%." When a customer KNOWS what is coming, they won't be SHOCKED when they get it.
Best Regards & Happy Fabricating!
Color Matching of Edges in Resined Slabs is a subject that is taught every month by AZ School of Rock. For more information, contact Kevin M. Padden at www.azschoolofrock.com , by phone at 480-309-9422 or via e-mail at info@azschoolofrock.com
 ")
")